Effective Ways to Create a Hanging Indent in Word 2025
Mastering formatting techniques such as the **hanging indent in Word** is essential for creating professional and polished documents. A **hanging indent** allows the first line of a paragraph to start at the margin, while subsequent lines are further indented, making it particularly useful for citations and reference lists, especially in academic writing. This article will guide you through various methods to **create hanging indent** effectively, ensuring your documents maintain a professional appearance.
Understanding Hanging Indents and Their Uses
A **hanging indent** is a punctuation style where the first line of a paragraph is flush left while subsequent lines are indented. This format is widely used for organizing bibliographic entries, making it essential for creating a reference page in academic assignments or professional papers. By understanding how to format a **hanging indent**, you can improve your document’s structure and enhance overall readability. Hanging indents can also be beneficial when listing bullet points in a structured layout. Mastering this formatting provides clarity and guides readers’ attention effectively, especially in lengthy documents.
The Basics of Formatting a Hanging Indent
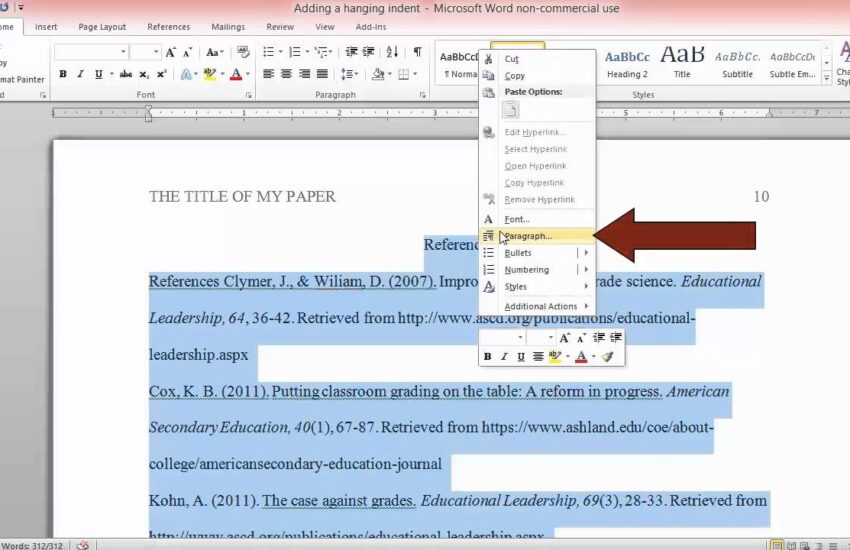
To create a **hanging indent**, begin by selecting the paragraph you wish to modify. Go to the “Paragraph” settings in the **Word paragraph formatting** menu. Here, you will find the indent options to adjust your hanging indent. Select the indentation dropdown, and under “Special,” choose “Hanging.” Set the measurement for the indent which typically ranges from 0.5 inches to 1 inch based on your requirements. This automates the hanging indent feature, and the selected paragraph will conform to the new indent rule, streamlining your indentation management.
Using the Ruler for Manual Adjustments
If you prefer a more hands-on approach, the ruler feature in Word can be utilized to create a **hanging indent** manually. Enable the ruler from the “View” tab if it’s not visible. Highlight the paragraph you want to adjust, then locate the two triangles on the ruler: the top triangle controls the first line indent, and the bottom triangle controls the hanging indent. Click and drag the bottom triangle to the desired position while keeping the top triangle in its original position. This technique allows for greater control and can be adjusted as needed for different parts of your document.
Specialized Techniques for Various Document Types
Different types of documents require tailored approaches for **applying hanging indents**. For instance, academic papers follow specific formatting guidelines such as MLA or APA, which often enforce hanging indents in the reference section. Understanding these formats will ensure your citations are compliant. In Word, adjustments are straightforward: once you have the references in place, simply apply a hanging indent through the methods previously discussed. Ensuring consistency in your indentation style is crucial for professional document formatting.
Formatting References in Academic Writing
In academic writing, a clean **hanging indent for citations** aids in the ease of navigating through multiple references. Most academic formats stipulate the use of hanging indents for their citations. For managing bibliographies, applying a hanging indent streamlines citation presentation, enhancing overall readability. To **create reference page hanging indent** in Word, open the references section, select the paragraph, and apply the hanging indent as discussed. This will ensure that all entries are uniformly presented.
Using Templates for Consistent Indentation
Templates often include predefined settings for paragraph indents and can save you time when formatting documents. By selecting a pre-designed template that uses **hanging indent styles** for references, you can ensure that your document maintains a consistent structure from the start. Editing these templates is straightforward; adjust the paragraph settings once, and every new document derived from the template will carry forward your customized **hanging indent settings**. This is particularly helpful for organizations or individuals who frequently produce formal documents.
Troubleshooting Common Formatting Challenges
Microsoft Word can sometimes present various indentation issues. Users may encounter challenges such as uneven hanging indents or unexpected shifts in formatting. When adjusting the **indentation techniques in Word**, ensure that paragraph formatting options are verified – if a hanging indent isn’t functioning, check for conflicting format settings that may cause irregularities. Additionally, using the “Clear Formatting” option can resolve unexpected issues that stem from previously set Word indent options.
Addressing Indentation Issues with Paragraph Settings
When facing problems with your hanging indent, revisit the **Word paragraph settings**. A common source of confusion is hidden formatting marks that alter the appearance of indents. To rectify this, enable “Show/Hide” in the Home tab to visualize spacing, and check for double spacing or line breaks that could influence indentation. A thorough review ensures that your formatting aligns with your expectations, allowing for a polished and structured document.
Leveraging Built-in Shortcuts for Efficiency
For those who want to **use Word hanging indent shortcuts**, familiarize yourself with keyboard shortcuts that expedite the formatting process. For instance, pressing “Ctrl + T” will quickly apply a **hanging indent** to the selected paragraph. This user-friendly hanging indent technique can significantly speed up the formatting of citations and references, especially in lengthy documents. Alternatively, “Ctrl + Shift + T” can be used to decrease an indent, giving small adjustments when necessary. These efficient shortcuts can be a game changer in managing formatting tasks effectively.
Key Takeaways
- Understanding how to create and adjust a **hanging indent in Word** enhances both readability and professionalism in your documents.
- Utilizing templates, shortcuts, and the ruler feature customizes your formatting approach, ensuring consistency across various documents.
- Troubleshoot common formatting errors by checking paragraph settings and clearing any conflicting formatting.
FAQ
1. How do I change paragraph indent settings in Word?
To change paragraph indent settings in Word, navigate to the “Paragraph” settings within your document. Here, you can adjust both left and right indents. For a **hanging indent**, select “Special” from the indent dropdown and choose “Hanging” to modify the first-line indent. This ensures your paragraphs appear as per your formatting requirements.
2. What is the purpose of a hanging indent in citations?
The purpose of a **hanging indent for bibliography** or citations is to clearly differentiate between individual references. This enhances document structure, making it easier for readers to scan and locate specific entries in the reference list. Standardization across citations keeps professionalism intact, especially in academic writings.
3. Can I automate hanging indents in Word?
Yes, you can automate **hanging indents** in Word by using styles. Creating or modifying a style that includes these settings allows you to apply the indent automatically to any paragraph tagged in that style. This dramatically saves time and ensures consistency throughout your documents.
4. How do hanging indents affect readability?
Having a **hanging indent** improves readability by creating a structured format that guides readers’ eyes along the text. It visually differentiates the first line from subsequent lines, helping to organize information neatly, especially in long lists and references. Proper formatting facilitates a better understanding of the content presented.
5. What should I do if my hanging indent is not working in Microsoft Word?
If your **hanging indent** settings aren’t functioning properly, check for conflicting styles affecting the paragraph or unintended spaces between lines. Resetting formatting or using Word’s “Clear Formatting” feature often resolves these problems. Ensure that the correct options are selected in the paragraph menu for proper adjustment.